Skype 6.7 - Failed to get proc address for GetLogicalProcessorInformation (KERNEL32.dll)

admin_u_comp | 7:34 PM | 0 comments


Salam Blogger.!

Bagi sobat yang menggunakan software Skype (r) setelah  melakukan update skype ke versi 6.7 kemudian muncul error Failed to get proc address for GetLogicalProcessorInformation (KERNEL32.dll), kemungkinan adalah karena OS Windows yang digunakan adalah OS Windows XP versi dibawah SP3.

Silahkan update  Windows XP sobat menjadi SP3 atau OS windows Diatas windows XP, bisa Windows 7, Windows 8 atau Windows 8.1.

== try this link ===
The only what you need to do in order to solve this issue is to update your Windows XP installation to Service Pack 3.

http://windows.microsoft.com/en-us/windows/help/learn-how-to-install-windows-xp-service-pack-3-sp3

The GetLogicalProcessorInformation function was first introduced in Windows XP with Service Pack 3 and was not present on older Windows XP installations.

More information here: https://support.skype.com/en/faq/FA12388/why-am-i-getting-a-fatal-error-kernel32-dll-when-i-try-to-launch-skype

Semoga bermanfaat...!

Cara Membuat Installer OS Windows 7 di Flashdisk

admin_u_comp | 2:02 PM | 3comments
Salam Blogger...!
Bagi sobat blogger atau netter yang ingin membuat Installer Windows 7 melalui UFD atau Flashdisk silahkan ikuti langkah2 seperti dibawah ini:
  • Silahkan download software nya Windows 7 USB DVD Tools, cari di mbah google.
  • Sebelum menjalankan file hasil download sobat harus menginstall Image Mastering API v2.0 (IMAPIv2.0) WindowsXP-KB932716-v2-x86-ENU.
  • Dan kita siapkan file Installer DVD atau Iso Windows 7. Bagi sobat yang belum ada bisa download Windows 7 iso klik DISINI.
  • Setelah selesai instalasi Image Mastering API v2.0 (IMAPIv2.0) WindowsXP-KB932716-v2-x86-ENU, file hasil download di unrar, kemudian klik 2x software nya, setelah finish, melalui showrtcut desktop Windows 7 USB DVD Download Tool, diklik 2x hingga muncul tampilan seperti ini :
  • Pada Botton Browse diklik kemudian kita arahkan ke file ISO Installer Windows 7. Setelah Alamat Source file sudah tertera dan jelas, kemudian klik next.
  • Kemudian kita pilih USB Device seperti pada tampilan di atas. selanjutnnya kita pilih USB Flashdisk yang telah kita siapkan. seperti pada tampilan dibawah ini :
  • Untuk selanjutnya kita Klik Begin Copying. Kalo ada tampilan dialog seperti dibawah ini silahkan pilih Erase USB Device. kemudian tekan YES.

  • Tunggu sampai proses Copying File dari ISO ke Flashdisk selesai.
  • Setelah selesai silahkan testart PC atau notebook anda dan arahkan booting nya ke USB Flashdisk yang tadi kita buat.
  • SELAMAT MENCOBA, GOOD LUCK...!

Cara Membuat Installer OS Windows XP di Flashdisk

admin_u_comp | 1:27 PM | 1comments
Salam Blogger...!!!


Bagi rekan2 blogger atau netter yang ingin membuat Installer OS Windows XP di UFD Flashdisk, yang dibutuhkan :
  1. Source Installer Windows XP. Kalau source Anda berbentuk DVD maka Anda butuh DVD ROM (bagi yang tidak punya bisa pinjam DVD ROM external ataupun pinjam laptop/komputer teman yang DVD ROM-nya masih bagus, hehe..).  Kalau source Anda berbentuk ISO maka Anda tidak perlu DVD ROM lagi tentunya.
  2. UFD minimal 2G.
  3. Download file MYA.zip di sini. File tersebut berisi folder MYA yang didalamnya ada 3 aplikasi penting yaitu BootSect, PeToUSB, dan USB_Prep8. Extract folder MYA ke harddisk Anda. Dalam contoh ini folder MYA saya extract ke (D:).
Membuat Bootable USB Flash Disk untuk Windows 7 dan Windows XP Image
Langkah-langkahnya:
  • Masuklah ke D: -> MYA -> PeToUSB_3.0.0.7 lalu klik kanan PeToUSB dan pilih Run as administrator.
Membuat Bootable USB Flash Disk untuk Windows 7 dan Windows XP Image
  • Bila muncul window UAC klik saja Yes.
Membuat Bootable USB Flash Disk untuk Windows 7 dan Windows XP Image
  • Akan muncul window PeToUSB. Pastikan Anda mencontreng dan mengisi pilihan seperti yang dilingkari merah dibawah ini. Kalau sudah klik Start.
Membuat Bootable USB Flash Disk untuk Windows 7 dan Windows XP Image
  • Akan ada konfirmasi continue. Klik Yes.
Membuat Bootable USB Flash Disk untuk Windows 7 dan Windows XP Image
  • Akan ada peringatan sekali lagi. Klik Yes.
Membuat Bootable USB Flash Disk untuk Windows 7 dan Windows XP Image
  • Setelah format selesai, klik OK.
Membuat Bootable USB Flash Disk untuk Windows 7 dan Windows XP Image
  • Buka Start -> All Programs -> Accessories, lalu klik kanan pada Command Prompt dan pilih Run As Administrator.
Membuat Bootable USB Flash Disk untuk Windows 7 dan Windows XP Image
  • Jika muncul windows UAC klik saya Yes.
Membuat Bootable USB Flash Disk untuk Windows 7 dan Windows XP Image
  • Ketik D: lalu tekan Enter. Selanjutnya ketik CD MYABOOTSECT kemudian tekan Enter.
Membuat Bootable USB Flash Disk untuk Windows 7 dan Windows XP Image
  • Perhatikan baik-baik drive letter UFD Anda. Dalam contoh ini UFD saya ada di drive G. Jadi ketikkan BOOTSECT /NT52 G: lalu tekan Enter (seumpama UFD Anda ada di K, maka perintah yang harus diketik adalah BOOTSECT /NT52 K:).
Membuat Bootable USB Flash Disk untuk Windows 7 dan Windows XP Image
  • Ketik CD.. lalu tekan Enter. Selanjutnya ketik CD USB_PREP8 kemudian tekan Enter.
Membuat Bootable USB Flash Disk untuk Windows 7 dan Windows XP Image
  • Ketik USB_PREP8 kemudian tekan Enter. Akan muncul beberapa keterangan. Tekan saja sembarang tombol.
Membuat Bootable USB Flash Disk untuk Windows 7 dan Windows XP Image
  • Selanjutnya akan ada beberapa jenis pilihan. Sebelumnya siapkan dulu Source Installer Windows XP Anda. Jika dalam bentuk DVD masukkan ke DVD ROM, jika dalam bentuk ISO segera mount dengan aplikasi virtual drive yang Anda punya.
  • Ketik angka 1 lalu tekan Enter.
Membuat Bootable USB Flash Disk untuk Windows 7 dan Windows XP Image
  • Pilih drive tempat Source Installer Windows XP Anda berada.
Membuat Bootable USB Flash Disk untuk Windows 7 dan Windows XP Image
  • Ketika angka 3 lalu tekan Enter.
Membuat Bootable USB Flash Disk untuk Windows 7 dan Windows XP Image
  • Masukkan drive letter UFD Anda. Karena tadi UFD ada di drive G maka ketikkan G lalu tekan Enter.
Membuat Bootable USB Flash Disk untuk Windows 7 dan Windows XP Image
  • Ketik angka 4 lalu tekan Enter. Selanjutnya akan muncul konfirmasi apakah Anda yakin untuk melakukan format. Ketik saja kemudian tekan Enter.
Membuat Bootable USB Flash Disk untuk Windows 7 dan Windows XP Image
  • Tunggu sampai proses format selesai. Lalu tekan sembarang tombol.
Membuat Bootable USB Flash Disk untuk Windows 7 dan Windows XP Image
  • Program akan melakukan proses, tunggu saja beberapa saat. Jika sudah muncul tampilan seperti di bawah ini tekan saja sembarang tombol.
Membuat Bootable USB Flash Disk untuk Windows 7 dan Windows XP Image
  • Akan muncul window konfirmasi. Klik Yes dan tunggu beberapa saat sampai proses selesai.
Membuat Bootable USB Flash Disk untuk Windows 7 dan Windows XP Image
  • Jika sudah selesai, akan muncul window Change Migrate seperti di bawah ini. Klik saja Yes.
Membuat Bootable USB Flash Disk untuk Windows 7 dan Windows XP Image
  • Klik Yes lagi untuk Unmount Virtual Drive.
Membuat Bootable USB Flash Disk untuk Windows 7 dan Windows XP Image
  • Setelah itu tekan sembarang tombol dua kali dan UFD kini sudah siap untuk digunakan.
  • Ketika akan digunakan jangan lupa untuk men-set BIOS supaya bisa melakukan booting dari USB.
Membuat Bootable USB Flash Disk untuk Windows 7 dan Windows XP Image
  • Untuk booting pertama kali pilih option nomor satu (TXT Mode). Setelah membuat partisi dan format harddisk serta copy file, komputer/laptop akan restart. Kali ini pilih option nomor dua (GUI Mode).
Membuat Bootable USB Flash Disk untuk Windows 7 dan Windows XP Image
Demikian penjelasan untuk membuat Bootable USB Flash Disk untuk Windows 7 dan Windows XP. Semoga bisa membantu Anda, khususnya bagi yang tidak memiliki DVD ROM. Selamat mencoba

Widget Chat dengan OPI Yahoo Messenger di Wibsite dan Blog

admin_u_comp | 10:14 AM | 4comments

komunikasi interaktif Yahoo Messenger di blogJika Admin website atau blog ingin membuka diri terhadap publik, atau membuka komunikasi interaktif, menerima comment dengan respon cepat, akan sangat elok jika website tersebut memasang widget Yahoo Messenger. Komunikasi via YM sangat efektif dan jauh lebih cepat bila dibandingkan dengan e-Mail. Komunikasi lebih hidup di banding dengan Short Message Services (SMS).

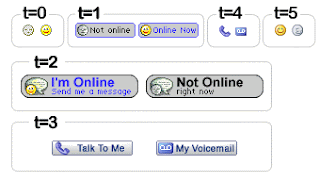
Widget ini cocok untuk blog tutorial, marketing, survey, Toko Online seperti webstore yang saya buat untuk client – www.bajuditoko.com. Ketika status Yahoo Messenger terlihat warna kuning (seperti gambar dibawah) di halaman web, artinya, dimungkinkan Anda melakukan komunikasi interaktif.


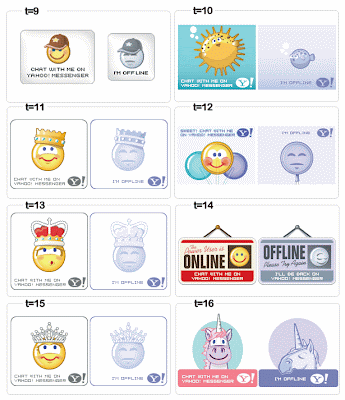
Cara pasang di blog  tidak berbeda jauh ketika kita memasang widget HTML baru. Lebih dahulu memilih icon Yahoo Messenger sesuai pilihan Anda. Disini masing-masing ada 2 status yang berpasangan, yakni Online status dan Offline status. Anda juga bisa membuat gambar icon sendiri di YM.

Pilih salah satu :
Untuk icon 0-5

memilih icon Yahoo Messenger di blog

Untuk icon 6-8

opsi icon Yahoo Messenger untuk website

Untuk icon 9-16

pipihan icon Yahoo Messenger website
Untuk icon 16-24  

Anda sudah punya pilihan icon? Sekarang buka Blogger atau Wordpress. Silahkan buka Design terus klik Page Elements -->Add Gadget --->klik opsi HTML /Javascript

Setelah itu copy dan paste kode dibawah ini :
 
<a href="ymsgr:sendIM?Id_yahoo_Anda"> <img src="http://opi.yahoo.com/online?u=Id_yahoo_Anda&amp;m=g&amp;t=0&amp;l=us"/></a>

Penting: Dari kode script diatas Anda harus mengganti tulisan Id_yahoo_Anda(di 2 tempat) dengan ID akun yahoo Anda (Ingat! jangan tempatkan alamat email YM (Yahoo) tetapi ID akun) yang sebenarnya. Contoh yusufzulkarnain atau erickthohir.

Tulisan t=0 diganti dengan Kode Status Yahoo yang telah Anda pilih diantara pilihan icon diatas (ganti dengan t=1 atau t=2 atau t=10 atau … t=17 atau … …. …..  t=24).

Save dan lihat hasilnya ....

Install Intermediate Certificate - Microsoft Management Console (MMC)

admin_u_comp | 3:25 PM | 0 comments
Installing Your Intermediate Certificate in Microsoft Management Console (MMC)

Article Purpose: This article provides step-by-step instructions for installing your intermediate certificate in Microsoft Management Console (MMC). If this is not the solution you are looking for, please search for you solution in the search bar above.

Note: If you don't already have the intermediate certificate(s) for your product, please visit the appropriate link below to copy the intermediate chain and paste it in a text editor. Save the ".crt" file to your desktop and begin the following instructions.


​Add Snap-in
  1. Open MMC (Start > Run > MMC) Click OK.
    Run MMC
  2. Click File. Select Add/Remove Snap-in.
    Add/Remove Snap-in
  3. Click Add.
    Add/remove Snap-in
  4. Select Certificates from the Add Standalone Snap-in box. Click Add.
    Add Standalone Snap-in
  5. Select Computer Account.
    Certificates snap-in
  6. Select Local Computer.
    Select Computer
  7. Close the Standalone Snap-in box. Click OK in the Add/Remove Snap-in and return to the MMC.

Install Your Intermediate and Root Certificate

  1. Right-click the Intermediate Certification Authorities folder. Click All Tasks > Import.
    Import
  2. When the Certificate Import Wizard appears, click Next.
    Certificate Import Wizard
  3. Locate the intermediate certificate(s) you saved and click Next.
    Certificate Import Wizard
  4. When the Wizard is completed click Finish. The GlobalSign Intermediate Certificate will now be installed.

    Note: If you are installing an ExtendedSSL (EVSSL) you will also need to install the cross certificate with the appropriate Intermediate certificate. Both certificates should be installed in the Intermediate Certification Authorities folder.

    Windows will normally have the GlobalSign root certificate installed by default. However, if you need to install the root certificate, follow the instructions as above, but import the root certificate into the Trusted Root Certification Authorities folder in the MMC.
TO GET The Intermediate Certificate please GO HERE OR GO HERE

Supported: https://support.globalsign.com

Download Blackberry Messenger BBM V8 dan Cara Aktivasi

admin_u_comp | 9:04 AM | 0 comments


Download di BlackBerry Beta Zone www.blackberry.com/beta, Atau dengan link yang lain : DISINI
Yg tanya BetaZone & Cara Daftar, baca www.berryindo.com/gabungkan-login-blackberry-beta-zone-dengan-blackberry-id/


Cara Download dan Instal
**** Pada saat posting, BBM v8 masih dalam versi beta dan hanya tersedia di BlackBerry BetaZone untuk member betazone, anda di perlukan isi keycode yang di kirim beta zone untuk aktifasi BBM v8. Keycode tersebut tidak bisa di sharing. Jangan instal dari link yang diberikan user lainnya karena anda tidak akan bisa aktifasi BBM v8 tanpa keycode dari account beta zone anda.
  1. Daftarkan BlackBerry Beta Zone, jika belum punya account. Beta Zone menggunakan login BlackBerry ID. Baca cara diatas. Pastikan email BBID anda terdaftar di email settings device BlackBerry anda untuk bisa membuka/membaca email pada saat anda dikirim keycode.
  2. Login ke BlackBerry Beta zone via browser BlackBerry anda (bukan PC) karena anda perlu download BBM v8 OTA dari browser langsung ke BlackBerry anda.
  3. Setelah login ke BlackBerry Beta Zone, Cari Program yang anda bisa daftarkan
  4. Ada BBM v8 di program, Klik daftar dan ikuti petunjuk
  5. Pilih Download (pastikan anda di jaringan stabil, cari koneksi wifi jika bisa untuk memastikan download lancar dan tidak putus)
  6. Setelah donwonload berhasil, Anda akan di minta reboot.
  7. Anda akan di kirim email dari BetaZone yang berisi keycode ke email BBID anda, buka email tersebut dari BlackBerry anda, copy.
  8. Buka BBM v8 terbaru anda, anda akan di minta paste keycode tersebut untuk aktifasi. Lakukan paste dan silakan gunakan BBM v8 anda.
Jika anda tidak menerima email keycode, coba pastikan lagi account BBID anda aktif di email settings. Kalau masih tidak menerima, cek spam folder via PC untuk mencari email dari beta zone. Jika masih tidak ada email dari beta zone. Masuk ke beta zone dan download ulang BBM v8. Pada saat download, keycode akan secara otomatis dikirim ke email BBID anda.

BBM for Android Installer Offline Download

admin_u_comp | 3:44 PM | 1comments

Salam Blogger...!

Bulan Oktober 2013, saat ini baru marak berita tentang BBM untuk OS Android, Bagi rekan-rekan yang ingin mengunduh Installer BBM for Android Offline tidak melalui Google.Play silahkan klik DISINI.
Karena masih sangat baru sekali terkadang untuk aktifasi butuh waktu 1-3 hari atau bahkan lebih. Dan karena masih dalam uji coba, app BBM ini belum sempurna.

Semoga bermanfaat...!!!

BBM Untuk Android

admin_u_comp | 3:18 PM | 0 comments


Mencari BBM App untuk Android . Ok di sini adalah BBM apk file untuk Android . Hanya Download dan Nikmati aplikasi BBM resmi pada ponsel Android Ponsel Anda . Versi RESMI BBM ™ dari BlackBerry sekarang di sini untuk Android . Beberapa orang juga mengatakan Apps BlackBerry untuk Android untuk paket ini . Dapatkan aplikasi BBM gratis untuk cara terbaik untuk tetap terhubung dengan teman dan keluarga . Download itu sekarang .

Dengan BBM , Anda dapat chatting dan berbagi secara real -time dengan kontak BBM Anda dan kelompok. Sebagai contoh, Anda dapat berbagi foto , melihat ketika seseorang telah membaca pesan Anda atau mengetik balasan , dan memperbarui status BBM atau gambar. Berbagi berita dengan beberapa orang menggunakan pesan broadcast , chatting multiperson , dan chatting kelompok .

Dengan Grup BBM , Anda dapat merencanakan acara , melacak to-do list , berbagi foto , dan chatting dengan sampai 30 orang pada waktu yang sama tanpa perlu untuk menambahkan mereka semua sebagai kontak BBM . Anda dapat menggunakan BBM melalui koneksi Wi - Fi , seperti saat Anda sedang bepergian untuk menghindari biaya data tambahan. Beberapa penyedia layanan nirkabel menawarkan cara bagi Anda untuk memeriksa penggunaan data Anda sehingga Anda tahu apakah rencana layanan Anda sesuai untuk bagaimana Anda menggunakan perangkat Anda .

BBM for Android Review by AndroidGuru

Memperkenalkan BBM app untuk fitur android :

Fitur yang didukung untuk BBM pada perangkat Anda adalah sebagai berikut :

Undang : Undang orang untuk chatting dengan Anda di BBM dengan memindai barcode BBM , dengan menggunakan teknologi NFC ( jika didukung oleh perangkat ) , atau dengan memasukkan nomor telepon , email , atau PIN BBM . Kontak yang tidak memiliki BBM belum dapat mendownloadnya dari undangan Anda

Chat: Bagi pengalaman anda dan pengalaman menggunakan pesan instan , gambar, dan catatan suara .

Emoticon : Ekspresikan diri Anda dengan klasik BBM emoticon .

BBM Groups: Merencanakan acara , melacak to-do list , berbagi foto , dan chatting dengan sampai 30 dari teman, keluarga , atau rekan kerja dalam satu kelompok pada waktu yang sama .

Chatting dengan teman di Android , BlackBerry dan iPhone :

    BBM selalu dan selalu terhubung - ada aplikasi untuk membuka
    Tahu kapan pesan telah disampaikan ( D ) dan membaca ( R )
    Berbagi foto , file, dokumen , catatan suara dan banyak lagi
    Lihat ketika kontak menanggapi pesan Anda
    Emoticon untuk setiap suasana hati dan emosi membiarkan Anda mengekspresikan diri
    BBM memungkinkan Anda melindungi privasi Anda . Anda mengendalikannya
    Anda memilih cara berbagi informasi Anda - BBM menggunakan PIN , bukan nomor telepon atau alamat email sehingga lebih pribadi dan Anda selalu mengontrol siapa yang dapat menghubungi Anda
    Anda memilih kontak Anda - 2 -arah opt -in berarti Anda memiliki kendali atas yang mampu pesan Anda
    Grup - Grup BBM membantu Anda berbagi gambar, daftar , dan janji dengan anggota kelompok . Anda bahkan dapat berada dalam kelompok dengan orang-orang yang bukan bagian dari daftar kontak BBM Anda sendiri .
    Chatting multi-person - Undang beberapa kontak untuk chatting bersama-sama .
    Pesan Broadcast - Kirim pesan ke beberapa kontak BBM pada satu waktu.

Blank Screen LED Error Codes for HP Notebook

admin_u_comp | 5:01 PM | 0 comments
This document pertains to HP Notebook PCs with the HP Unified Extensible Firmware Interface (UEFI) beginning in late-2008.

On startup, you may see a blank screen. If the diagnostic utilities detect a specific problem with hardware components, the fan turns on, but the screen remains blank. To help identify the cause of the problem, various LED lights on the keyboard blink a series of codes.
The diagnostic utilities use the LEDs near the Num Lock or Caps Lock keys to blink a series of error codes. At the end of the series the blinking stops. The pattern of blinks will occur any time you attempt to start the computer until the error is resolved.

Battery power LED blinks
The Battery power LED indicates the condition of the power supply. When starting the computer, or when the computer is in operation, use the chart to identify the power condition.
Battery Power LED
Component Tested
Error Condition
Battery power LED off, and Caps Lock/Num Lock off
Battery or AC Adapter
AC adapter not connected or failure

Battery low charge or failure
Battery power LED blinking
Battery
Insufficient charge on the battery
Blinking on charger cord
When new computer is used for first time, the white LED light for the AC power connector blinks.
Battery is still in "Shipping Mode", the light continues to blink even when AC power is connected.

To resolve, turn off notebook, connect AC power and allow battery to charge for at least 30 minutes, then start computer.

LEDs near Caps Lock and Number Lock keys blink when starting notebook
The LED lights near the Caps Lock and Num Lock keys will blink if an error is detected during the start up process. The LEDs will blink a number of times in a sequence and then stop. The number of blinks in the sequence indicates what component caused an error when it was being tested during start up.
If the LEDs stop blinking and the computer does not start, you can press the power button again to repeat the tests. Count the number of blinks, and use the chart to identify the error condition.
Knowing the number of blinks is helpful when you contact an HP support agent for technical help.
Caps Lock/Num Lock LED
Component Tested
Error Condition
LEDs blink 1 time
CPU
CPU not functional
LEDs blink 2 times
BIOS
BIOS corruption failure
LEDs blink 3 times
Memory
Module error not functional
LEDs blink 4 times
Graphics
Graphics controller not functional
LEDs blink 5 times
System board
General system board failure
LEDs blink 6 times
BIOS
BIOS authentication failure

Error code explanations
The sections below provide some common explanations for each error code listed in the table above.


When the computer is on battery power only and the AC adapter is disconnected, if the Battery Power and Caps Lock / Number Lock LEDs do not glow, there is either a very low change or no charge in the battery. Connect the AC power adapter, verify that the battery power LED glows, allow the battery to charge for 15 - 30 minutes and then attempt to start the computer. If it starts, run the battery test and calibrate the battery. If it does not start, if possible, connect a replacement battery to verify that the battery is the problem.
If the computer does not start after charging the battery, remove the battery and connect the AC power supply. Verify that the battery power LED glows, and then attempt to start the computer. If the LED still does not glow, either the AC adapter has failed, or there is a bad connection between the adapter and the system board. If possible, connect a different AC power adapter to verify that the adapter is the problem, or contact HP for support which may require a service event.

Insufficient charge on the battery

If the battery light LED (which looks like a lightning bolt ) flashes, the battery has insufficient charge to start the computer. To resolve this error, try the following solutions.
  • Connect the notebook PC to AC power and attempt to start the computer again.
    • Check the AC adapter to confirm that all of the plugs are securely seated.
    • Determine if the power LED on the AC adapter is lit (if available) to verify that the computer is receiving AC power from the wall outlet.
  • If the computer operates on AC power correctly, charge the battery for thirty minutes to one hour and then restart the computer.

NOTE:Charging the battery for this length of time is called "trickle charging". Trickle charging is a continuous constant-current charge at a low rate, which recharges the battery slowly when it is in a deep discharge state. Deep discharge occurs when a battery is left unused for extended periods of time.

CPU not functional

The computer processor (Blink code 1) has stopped functioning properly. Contact HP for assistance.

BIOS corruption failure

If a BIOS corruption error occurs (Blink code 2), you may not even notice the blink codes, because as soon as the computer recognizes the error, it restarts, attempts to recover the BIOS, and then restarts again. You may notice an extra-long startup process as a result, and a message indicating that the BIOS has been recovered may display on startup. If this occurs, update the BIOS on the computer. For more information, refer to the HP Notebook PCs - Locate and Install Updated BIOS, Drivers, and Software .
support document.

Module error not functional

If you experience a memory failure (Blink code 3), follow the guide in the table below.
If Using Original Memory
If New Memory Is Added
Reseat the memory.

If reseating the memory does not resolve the problem, try replacing the memory with new memory.
Reseat the memory.

If you continue to experience this error code after reseating the memory, the problem may be with the memory itself. Take the new memory out of the computer, put the original memory back into the computer, and then retest it.
If you do not feel comfortable reseating the memory yourself, take the computer to a computer retailer and ask them to reseat it for you.

NOTE:Some memory module errors may allow the computer to start but will then cause the computer to restart and display a blinking error code.

Graphics controller not functional

If you experience a graphics controller failure (Blink code 4), contact HP for assistance.

General system board failure

A general system board failure (Blink code 5) is the failure of a component not covered by the other LED error codes. Contact HP for assistance.

BIOS authentication failure

The BIOS authentication error (Blink code 6) is extremely rare. It is the result of a discrepancy between the BIOS and the hardware that is installed on the computer. This error occurs when the BIOS cannot authenticate signatures from the hardware on the system. The purpose of the BIOS authentication is to be sure that no one has tampered with the BIOS on the computer.
If a BIOS authentication failure occurs, the computer automatically performs a BIOS recovery. If the computer does not automatically recover the BIOS, manually perform a BIOS recovery. To manually perform a BIOS recovery, press all four arrow keys at the same time to cause the BIOS to go to the EFI partition to find and recover the current BIOS.

Source : www1.hp.com
 
Support : Usamah Computer | Usamah Computer Online Shop
Copyright © 2021. ..:: Usamah Computer ::.. - All Rights Reserved
Template Modify by Usamah Computer
Proudly powered by Blogger